MongoDB Sharding and Replication
08 Feb 2022
Sharding and replication are essential techniques of making the MongoDB database scalable, reliable, and highly available.
This tutorial will show how to set up the replicated Sharded MongoDB cluster on top of the isolated Docker containers as example hosts and walk you through the basics required to understand each step.
Replication
Replication provides redundancy, high availability, and fault tolerance against losing a single database server by copying data to different MongoDB servers.
A replica set is a set of MongoDB instances storing copies of the same data. Clients read from the primary by default; however, clients can choose to read from secondaries.
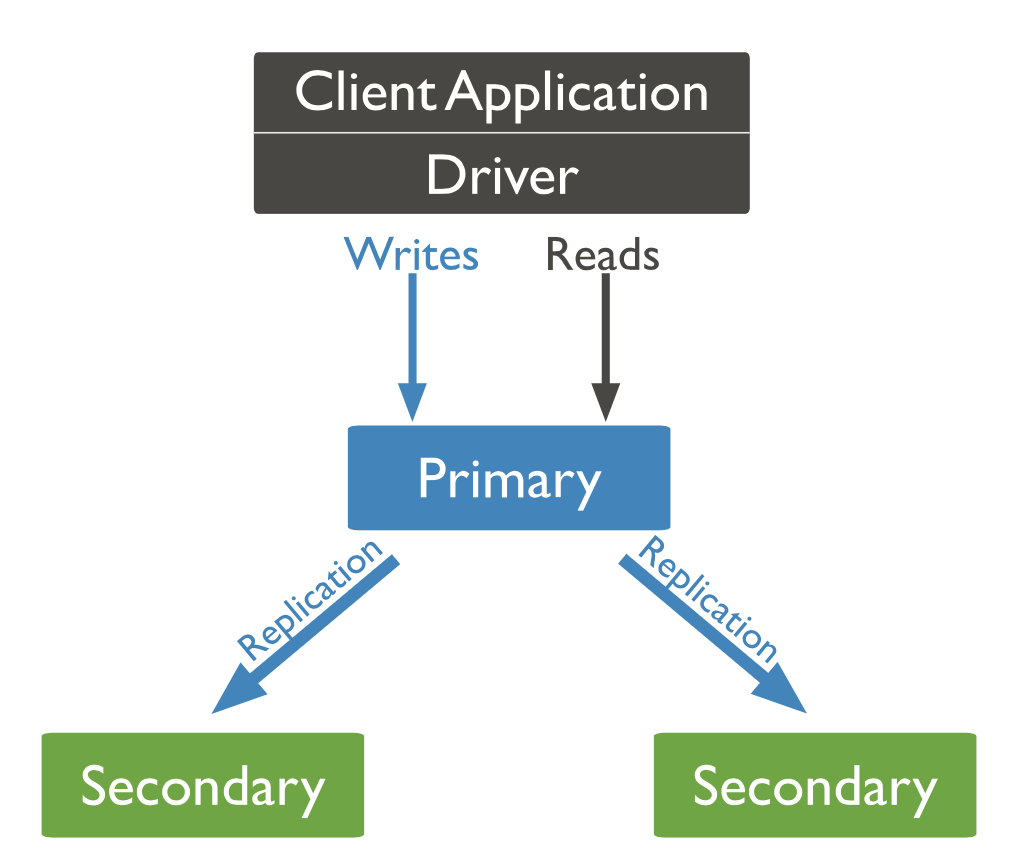
MongoDB provides the automatic failover - when the primary node stops communicating with others, the election of a new primary node happens.
For more details, please take a look at the official documentation.
Sharding
According to the official MongoDB documentation (https://docs.mongodb.com/manual/sharding/): “Sharding is a method for distributing data across multiple machines. MongoDB uses sharding to support deployments with very large data sets and high throughput operations.”.
It allows us to scale the database horizontally by distributing the data between nodes (shards) based on the shard key. The shard key consists of a field or multiple fields in the document.
MongoDB is sharding data on the collection level. Not sharded collections are stored on one of the shards.
To shard a populated collection, it must have an index for the shard key. If you are sharding the empty collection, the database will automatically create the index.
Advantages
- Load distribution between shards
- Storage Capacity - data distribution between shards
Sharded Cluster
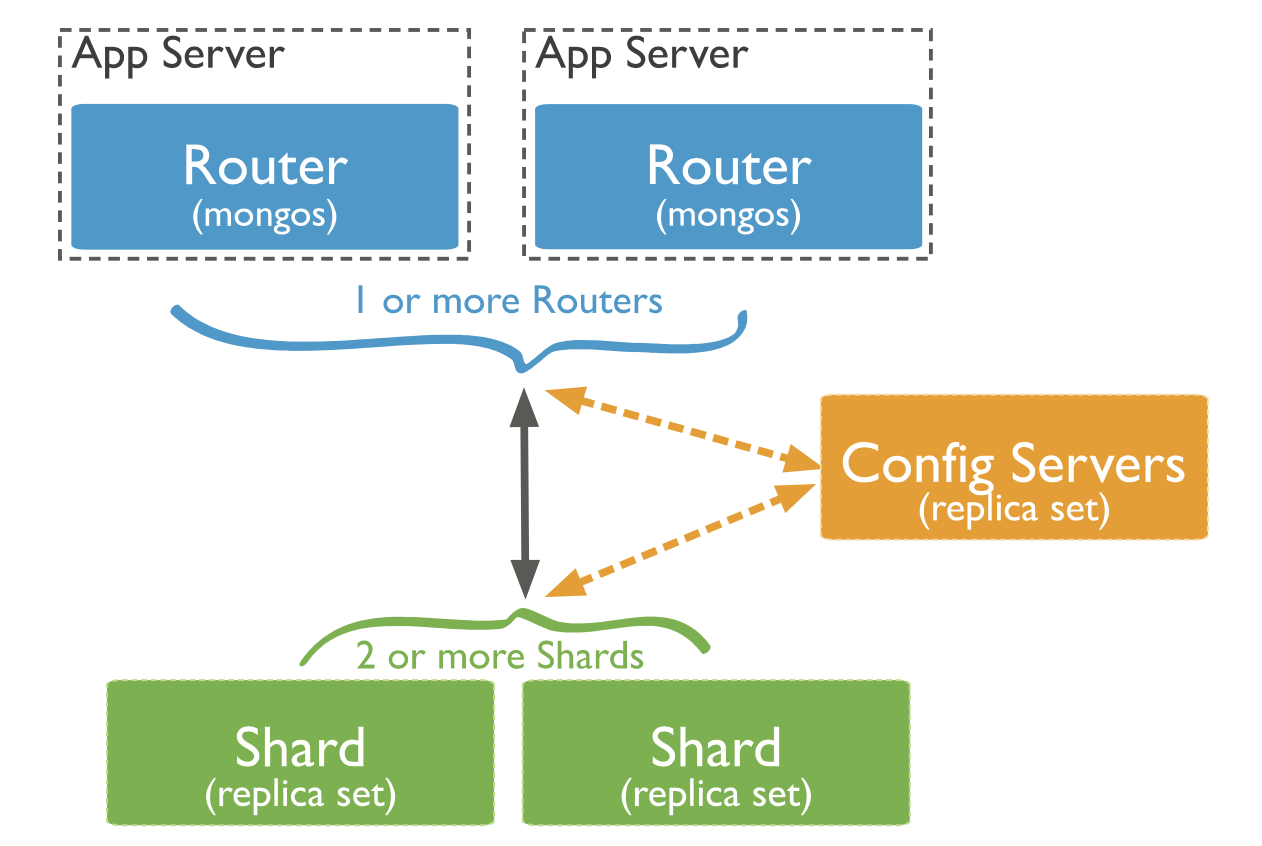
There are three components used in sharded clusters: shard, mongos, and config servers.
- shard - MongoDB instance, which stores a subset of sharded data. It may be deployed as a replica set to achieve the data replication.
- mongos - query router, which uses config servers to access the data on the correct shard.
- config servers store metadata and configuration settings for the cluster.
Sharding Strategy
There are two sharding strategies supported:
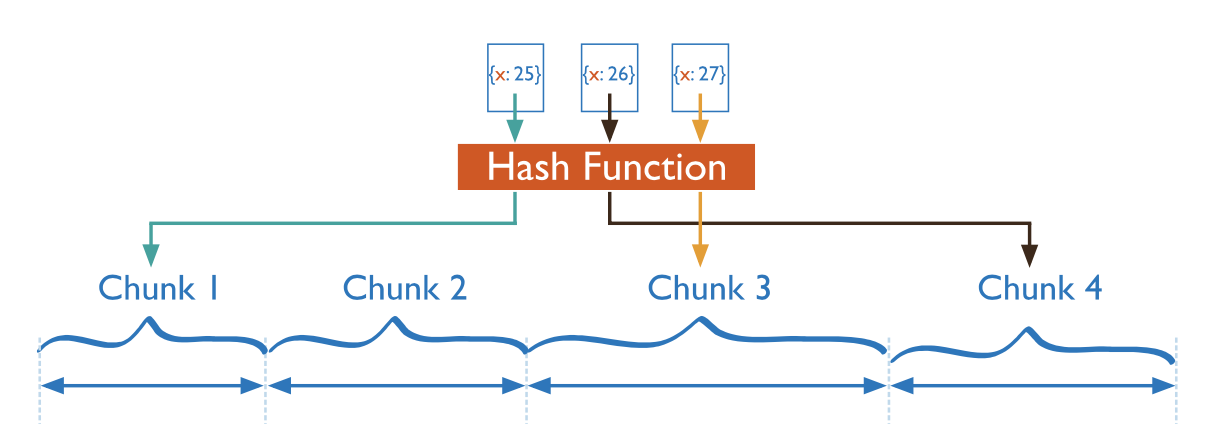
- Hashed Sharding computes a hash from the sharding key value. The chunk is assigned based on this hash. It ensures the even distribution of data, but the range-based queries will likely result in more cluster-wide broadcast operations.
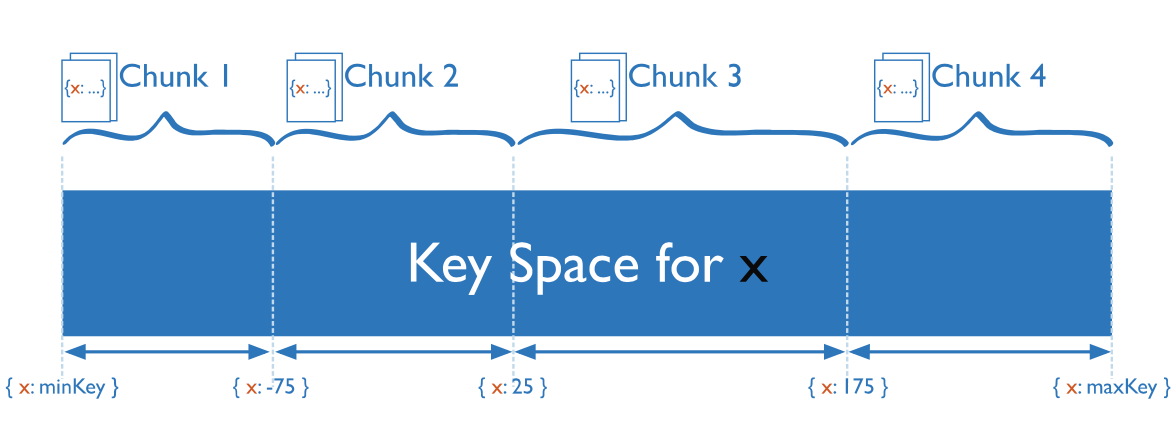
- Ranged Sharding - the chunk is assigned range based on shard keys values.
DB description
The database used as an example is a part of my Master’s thesis. We will use only three simple collections for this tutorial, which will be enough to try the replication and sharding.
// boards collection document
{
    _id: ObjectId("..."),
    name: "Board name"
}

// boardMessages collection document
{
    _id: ObjectId("..."),
    body: "Hello world!",
    // globalId for easy name, avatar, and other info loading
    author: "example@gmail.com",
    timestamp: "2020-09-09T13:30:42", // UTC string timestamp
    boardId: ObjectId("...")
}

// users collection document
{
    _id: ObjectId("..."),
    // user's id in global system (auth purposes, etc.)
    globalId: "example@gmail.com",
    boardsAccess: [ ObjectId("boardId1"), ... ]
}
We have the boards collection to store the board (team, channel, etc.) information. In our case, it is the name of the board. Board messages are stored in a separate collection and have the body for the message content, author to identify the user authored the message, timestamp as a string, and the boardId.
And the third collection is used to store the users’ data. The application itself does not deal with authentication and storing user passwords. It uses a separate service for that. So, the document of this collection contains the globalId property to keep the user’s id from this service (email, number, hash, etc.) to identify it. The list of boards the user has access to is stored in this collection as well in boardAccess property.
In both board messages and users, we don’t use DBRefs since the manual referencing is enough for the application. All needed data will be partially loaded to the frontend to avoid waiting. In addition, in our case, it is a simple reference to documents from one collection. For this case, even the official documentation suggests using manual referencing https://docs.mongodb.com/manual/reference/database-references/.
Docker
This guide requires only basic knowledge of Docker since it is not about Docker at all. It is helpful in this context to try replication and sharding on isolated instances imitating real servers with no shared packages, files, etc. And it does not require you to pay for virtual machines to your favorite Cloud Service Provider.
Preparing the infrastructure
As a first thing, we will need to create the user-defined bridge network named “chat-network.” We need this to make our MongoDB instances discoverable by their containers names. Without that, all containers will use the default bridge network, which unfortunately does not allow this - you will be able to access instances from another container only by using the container id, which is not as convenient as using simple domain names (more information can be found in official documentation). In addition, when you will create your infrastructure using the commands from this tutorial, you will have another container ids, but container names are the same.
docker network create chat-network
Then we will create shards replica sets using the Docker’s run command. Docker will pull the image automatically, but it is possible to do it manually as well:
docker pull mongo
We will have three shards, and each of them will have two replicas - we need to create nine containers. All commands have the same pattern.
-dparameter will run the container in detached mode https://docs.docker.com/engine/reference/run/#detached–d.-pwill publish the port to connect to the container from outside. In addition, we can use another port on our machine for resolving conflicts https://docs.docker.com/config/containers/container-networking/#published-ports.--networkwill connect our container to the previously created network https://docs.docker.com/network/bridge/#connect-a-container-to-a-user-defined-bridge.--volumewill map the directory on our machine to the directory inside the docker container, so the data will be persistent and stored in the defined directory https://docs.docker.com/storage/volumes/.--namewill set the container name.mongois the image name we use to create and run the container.- Finally, the last, fourth, line is the command executed in your container on start. It starts the
mongodprocess as a shard server (shardsvrmongo sharding cluster role) inside the replica set “mongors{shard}” with database stored in/data/dbpath and waiting for connections on port27017.
docker run -d -p 20010:27017 --network chat-network \
     --volume $(pwd)/mongo/shard1/0:/data/db \
     --name chat-shard1 mongo \
     mongod --shardsvr --replSet mongors1 --dbpath /data/db --port 27017
docker run -d -p 20011:27017 --network chat-network \
     --volume $(pwd)/mongo/shard1/1:/data/db \
     --name chat-shard1-replica1 mongo \
     mongod --shardsvr --replSet mongors1 --dbpath /data/db --port 27017
docker run -d -p 20012:27017 --network chat-network \
     --volume $(pwd)/mongo/shard1/2:/data/db \
     --name chat-shard1-replica2 mongo \
     mongod --shardsvr --replSet mongors1 --dbpath /data/db --port 27017

docker run -d -p 20020:27017 --network chat-network \
     --volume $(pwd)/mongo/shard2/0:/data/db \
     --name chat-shard2 mongo \
     mongod --shardsvr --replSet mongors2 --dbpath /data/db --port 27017
docker run -d -p 20021:27017 --network chat-network \
     --volume $(pwd)/mongo/shard2/1:/data/db \
     --name chat-shard2-replica1 mongo \
     mongod --shardsvr --replSet mongors2 --dbpath /data/db --port 27017
docker run -d -p 20022:27017 --network chat-network \
     --volume $(pwd)/mongo/shard2/2:/data/db \
     --name chat-shard2-replica2 mongo \
     mongod --shardsvr --replSet mongors2 --dbpath /data/db --port 27017

docker run -d -p 20030:27017 --network chat-network \
     --volume $(pwd)/mongo/shard3/0:/data/db \
     --name chat-shard3 mongo \
     mongod --shardsvr --replSet mongors3 --dbpath /data/db --port 27017
docker run -d -p 20031:27017 --network chat-network \
     --volume $(pwd)/mongo/shard3/1:/data/db \
     --name chat-shard3-replica1 mongo \
     mongod --shardsvr --replSet mongors3 --dbpath /data/db --port 27017
docker run -d -p 20032:27017 --network chat-network \
     --volume $(pwd)/mongo/shard3/2:/data/db \
     --name chat-shard3-replica2 mongo \
     mongod --shardsvr --replSet mongors3 --dbpath /data/db --port 27017
If you have a Docker Desktop, you can validate those changes using the UI:
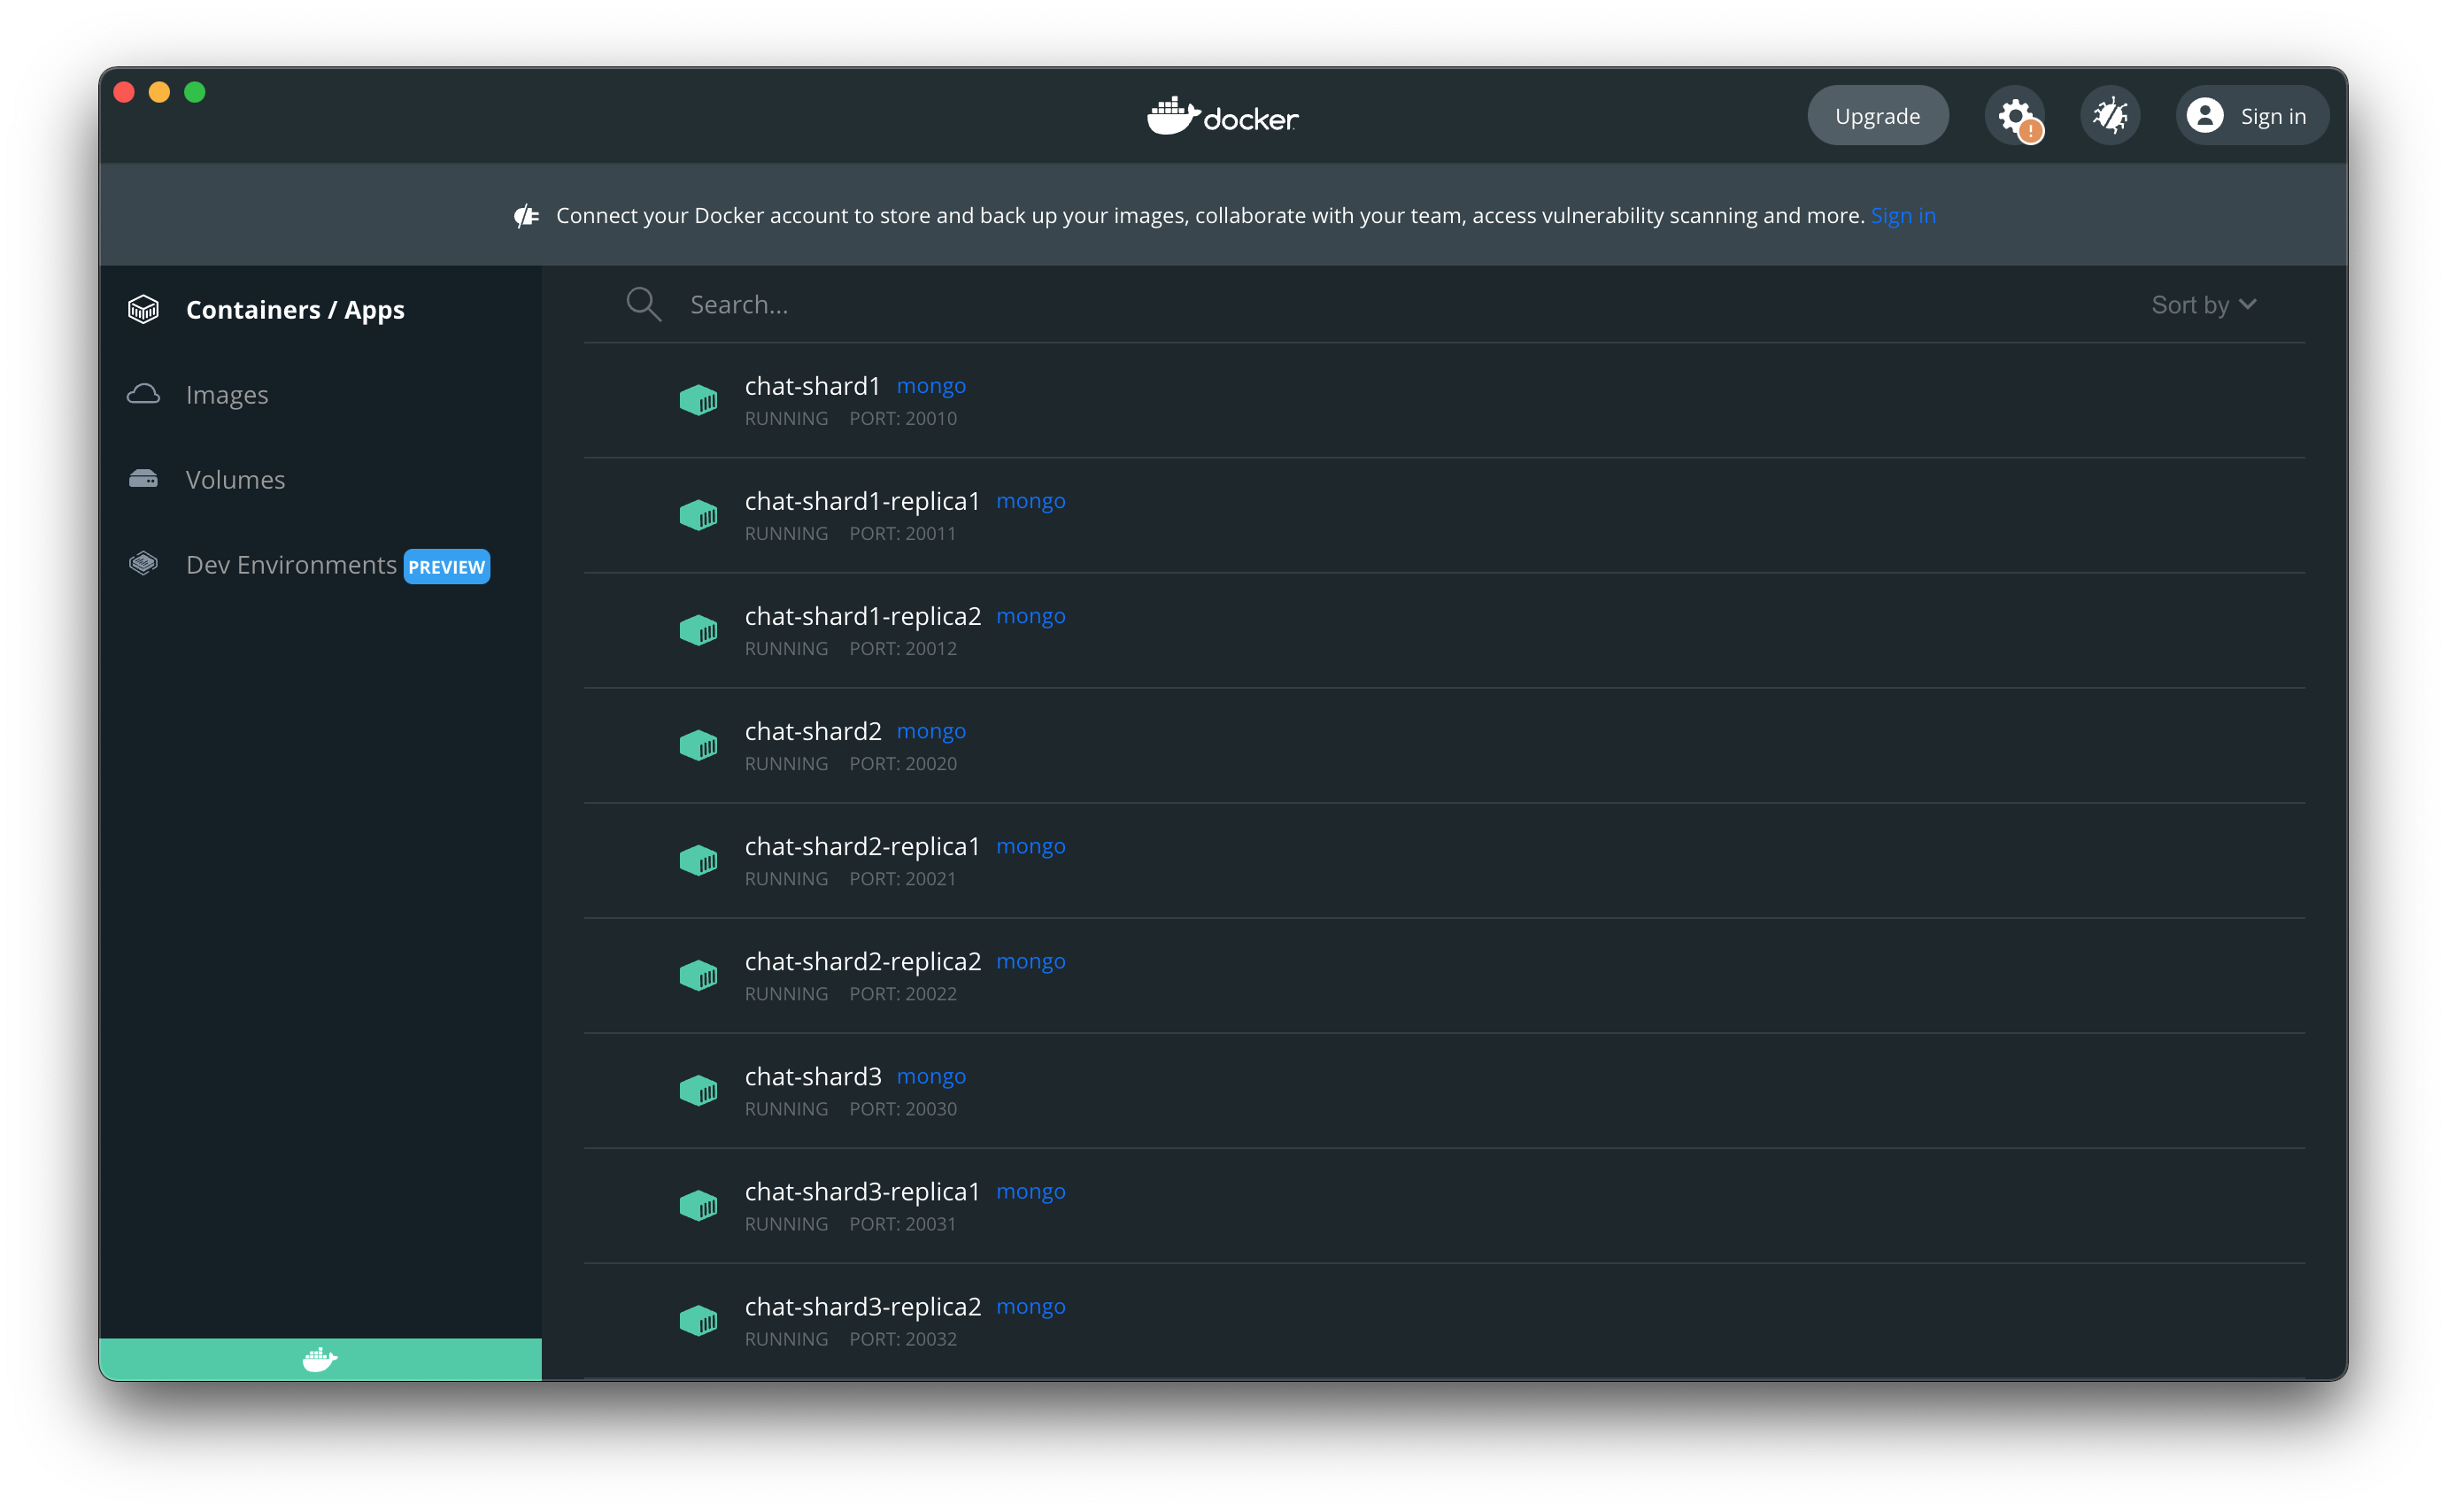
The next part is to create containers for config servers. The command pattern is the same, and the only difference is the command executed on container start. It starts the mongod process with the configsvr sharding cluster role.
docker run -d -p 20040:27017 --network chat-network \
     --volume $(pwd)/mongo/cfg/0:/data/db \
     --name chat-cfg mongo \
     mongod --configsvr --replSet confrs --dbpath /data/db --port 27017

docker run -d -p 20041:27017 --network chat-network \
     --volume $(pwd)/mongo/cfg/1:/data/db \
     --name chat-cfg-replica1 mongo \
     mongod --configsvr --replSet confrs --dbpath /data/db --port 27017

docker run -d -p 20042:27017 --network chat-network \
     --volume $(pwd)/mongo/cfg/2:/data/db \
     --name chat-cfg-replica2 mongo \
     mongod --configsvr --replSet confrs --dbpath /data/db --port 27017
And the last step we need is creating the container for mongos. The command starts the mongos process on port 27017 with configuration database replica set mapping.
It is OK to use 27017 for containers we defined the mapping for because it is the routing between docker containers inside a user-defined bridge network. Containers act like independent machines.
docker run -d -p 20050:27017 --network chat-network \
     --name chat-mongos mongo \
     mongos --configdb confrs/chat-cfg:27017,chat-cfg-replica1:27017,\
chat-cfg-replica2:27017 --port 27017
Check containers in Docker Desktop:
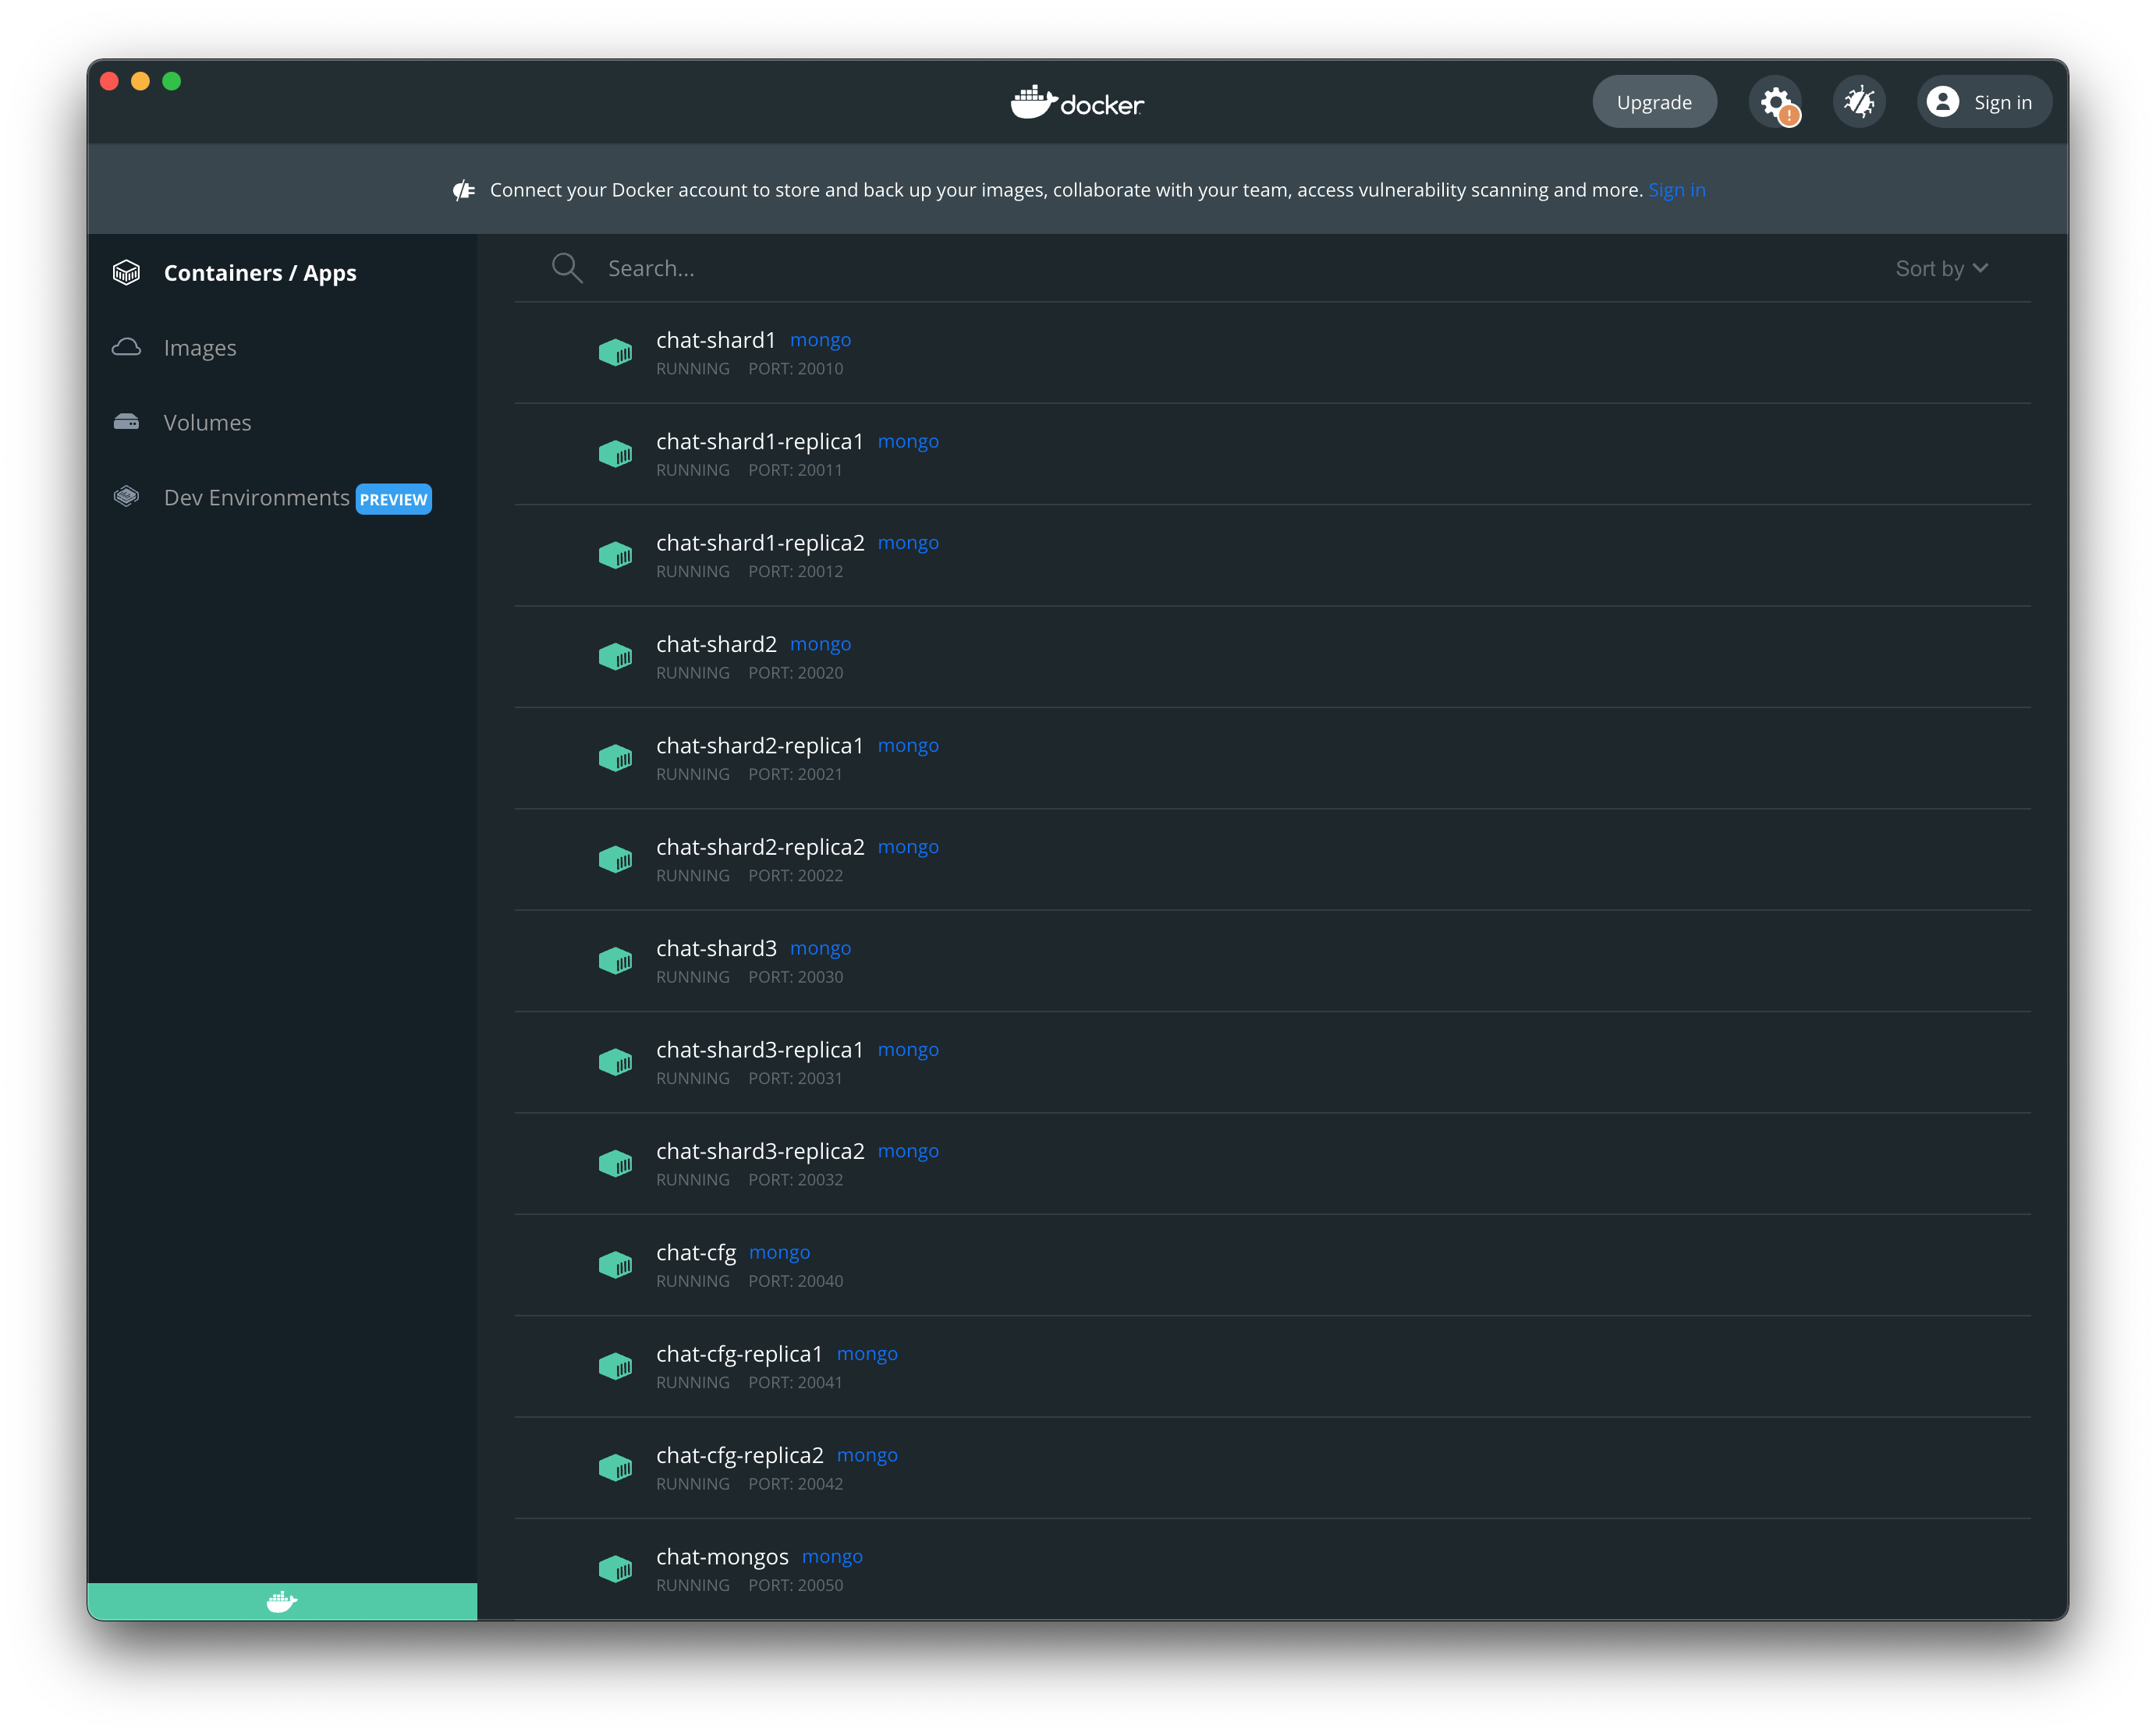
Initiating replica sets
First, we need to connect to the container using the following command that runs bash inside the container:
docker exec -it chat-cfg bash
chat-cfg is the name of the container.
After that, we will start the mongo shell:
mongosh
Initiate the replica set and add other members:
rs.initiate()
rs.add("chat-cfg-replica1:27017")
rs.add("chat-cfg-replica2:27017")
We added other instances using the container name. But the current instance is automatically added using the container id. The easiest way of fixing it is:
cfg = rs.conf()
cfg.members[0].host = "chat-cfg"
rs.reconfig(cfg)
And finally, we can validate the configuration:
confrs [direct: primary] test> rs.conf()
{
	...
	"members" : [
		{
			"_id" : 0,
			"host" : "chat-cfg:27017",
			"arbiterOnly" : false,
			"buildIndexes" : true,
			"hidden" : false,
			"priority" : 1,
			"tags" : {

			},
			"secondaryDelaySecs" : NumberLong(0),
			"votes" : 1
		},
		{
			"_id" : 1,
			"host" : "chat-cfg-replica1:27017",
			...
		},
		{
			"_id" : 2,
			"host" : "chat-cfg-replica2:27017",
			...
		}
	],
	"configsvr" : true,
	...
}
Now we can do the same for our shards replica sets:
# shard1
docker exec -it chat-shard1 bash

mongosh

rs.initiate()

cfg = rs.conf()
cfg.members[0].host = "chat-shard1"
rs.reconfig(cfg)

rs.add("chat-shard1-replica1:27017")
rs.add("chat-shard1-replica2:27017")

# shard2
docker exec -it chat-shard2 bash

mongosh

rs.initiate()

cfg = rs.conf()
cfg.members[0].host = "chat-shard2"
rs.reconfig(cfg)

rs.add("chat-shard2-replica1:27017")
rs.add("chat-shard2-replica2:27017")

# shard3
docker exec -it chat-shard3 bash

mongosh

rs.initiate()

cfg = rs.conf()
cfg.members[0].host = "chat-shard3"
rs.reconfig(cfg)

rs.add("chat-shard3-replica1:27017")
rs.add("chat-shard3-replica2:27017")
Sharding
We need to connect to mongos container the same way we did before:
docker exec -it chat-mongos bash

mongosh
And add all replica sets as shards:
[direct: mongos] test> sh.addShard("mongors1/chat-shard1:27017,
chat-shard1-replica1:27017,chat-shard1-replica2:27017")
{
  shardAdded: 'mongors1',
  ok: 1,
  '$clusterTime': { ... },
  operationTime: Timestamp(...)
}

[direct: mongos] test> sh.addShard("mongors2/chat-shard2:27017,
chat-shard2-replica1:27017,chat-shard2-replica2:27017")
{
  shardAdded: 'mongors2',
  ok: 1,
  '$clusterTime': { ... },
  operationTime: Timestamp(...)
}

[direct: mongos] test> sh.addShard("mongors3/chat-shard3:27017,
chat-shard3-replica1:27017,chat-shard3-replica2:27017")
{
  shardAdded: 'mongors3',
  ok: 1,
  '$clusterTime': { ... },
  operationTime: Timestamp(...)
}
Initialize the database
We currently have a sharded MongoDB cluster, which does not store any collection of documents. Let’s create our collections in the chat database:
[direct: mongos] test> use chat
switched to db chat

[direct: mongos] chat> db.createCollection("boardMessages")
{ ok: 1 }
[direct: mongos] chat> db.createCollection("boards")
{ ok: 1 }
[direct: mongos] chat> db.createCollection("users")
{ ok: 1 }

[direct: mongos] chat> show collections
boardMessages
boards
users
Enable sharding
To check if the database has sharding enabled, query the databases collection in the config database. A database has sharding enabled if the value of the partitioned field is true.
[direct: mongos] chat> use config
switched to db config

[direct: mongos] config> db.databases.find()
[
  {
    _id: 'chat',
    primary: 'mongors3',
    partitioned: false,
    version: {
      uuid: UUID(...),
      timestamp: Timestamp(...),
      lastMod: 1
    }
  }
]
The following query returns no data since we have no database with enabled sharding yet:
[direct: mongos] config> db.databases.find({ "partitioned": true })
Enable sharding for chat database:
[direct: mongos] config> db.adminCommand({enableSharding : "chat"})
{
  ok: 1,
  '$clusterTime': {
    clusterTime: Timestamp(...),
    signature: { ... }
  },
  operationTime: Timestamp(...)
}
Now we can see that the chat database has a partitioned property set to true:
[direct: mongos] config> db.databases.find()
[
  {
    _id: 'chat',
    primary: 'mongors3',
    partitioned: true,
    version: {
      uuid: UUID(...),
      timestamp: Timestamp(...),
      lastMod: 1
    }
  }
]
To list the current set of configured shards, use the listShards command, as follows:
[direct: mongos] config> db.adminCommand( { listShards : 1 } )
{
  shards: [
    {
      _id: 'mongors1',
      host: 'mongors1/chat-shard1:27017,chat-shard1-replica1:27017,
chat-shard1-replica2:27017',
      state: 1,
      topologyTime: Timestamp(...)
    },
    {
      _id: 'mongors2',
      host: 'mongors2/chat-shard2:27017,chat-shard2-replica1:27017,
chat-shard2-replica2:27017',
      state: 1,
      topologyTime: Timestamp(...)
    },
    {
      _id: 'mongors3',
      host: 'mongors3/chat-shard3:27017,chat-shard3-replica1:27017,
chat-shard3-replica2:27017',
      state: 1,
      topologyTime: Timestamp(...)
    }
  ],
  ok: 1,
  '$clusterTime': {
    clusterTime: Timestamp(...),
    signature: { ... }
  },
  operationTime: Timestamp(...)
}
Now we have the sharding enabled for the chat database, so let’s shard the boardMessages collection using the author field as a sharding key and the hashed sharding strategy (choosing the best sharding key for application purposes is out of scope of this tutorial):
[direct: mongos] config> sh.shardCollection("chat.boardMessages",
{author: "hashed"})

{
  collectionsharded: 'chat.boardMessages',
  ok: 1,
  '$clusterTime': {
    clusterTime: Timestamp(...),
    signature: { ... }
  },
  operationTime: Timestamp(...)
}
Validation
Currently, we don’t have any data stored in this collection. Let’s fill it with some test data so we can validate that sharding works well in our cluster:
[direct: mongos] test> use chat
switched to db chat

[direct: mongos] chat> for (var i = 0; i < 10000; i++) {
... db.boardMessages.insertOne({
..... body: "Hello World! I'm " + i,
..... author: "user" + i + "@email.com",
..... timestamp: "2021-11-27T00:51:0" + (i % 10),
..... boardId: ObjectId()
..... })
... }
Using the next command we can check the sharding status:
[direct: mongos] config> sh.status()
shardingVersion
{
  _id: 1,
  minCompatibleVersion: 5,
  currentVersion: 6,
  clusterId: ObjectId("61a0224db8f952d405aa8532")
}
---
shards
[
  {
    _id: 'mongors1',
    host: 'mongors1/chat-shard1:27017,chat-shard1-replica1:27017,
chat-shard1-replica2:27017',
    ...
  },
  {
    _id: 'mongors2',
    ...
  },
  {
    _id: 'mongors3',
    ...
  }
]
...
databases
[
  {
    database: {
      _id: 'chat',
      primary: 'mongors3',
      partitioned: true,
      version: { ... }
    },
    collections: {
      'chat.boardMessages': {
        shardKey: { author: 'hashed' },
        unique: false,
        balancing: true,
        chunkMetadata: [
          { shard: 'mongors1', nChunks: 2 },
          { shard: 'mongors2', nChunks: 2 },
          { shard: 'mongors3', nChunks: 2 }
        ],
        chunks: [
          { min: { author: MinKey() },
max: { author: Long("-6148914691236517204") }, 'on shard': 'mongors1',
'last modified': Timestamp({ t: 1, i: 0 }) },
          { min: { author: Long("-6148914691236517204") },
max: { author: Long("-3074457345618258602") }, 'on shard': 'mongors1',
'last modified': Timestamp({ t: 1, i: 1 }) },
          { min: { author: Long("-3074457345618258602") },
max: { author: Long("0") }, 'on shard': 'mongors2',
'last modified': Timestamp({ t: 1, i: 2 }) },
          { min: { author: Long("0") },
max: { author: Long("3074457345618258602") }, 'on shard': 'mongors2',
'last modified': Timestamp({ t: 1, i: 3 }) },
          { min: { author: Long("3074457345618258602") },
max: { author: Long("6148914691236517204") }, 'on shard': 'mongors3',
'last modified': Timestamp({ t: 1, i: 4 }) },
          { min: { author: Long("6148914691236517204") },
max: { author: MaxKey() }, 'on shard': 'mongors3',
'last modified': Timestamp({ t: 1, i: 5 }) }
        ],
        tags: []
      }
    }
  },
  ...
]
From the output above, we can determine which shard stores which chunks and which hash ranges are used to distribute the data between chunks.
Finally, we can check the percentage of data distributed to each shard:
[direct: mongos] chat>
db.getSiblingDB("chat").boardMessages.getShardDistribution()

Shard mongors3 at mongors3/chat-shard3:27017,chat-shard3-replica1:27017,
chat-shard3-replica2:27017
{
  data: '457KiB',
  docs: 3331,
  chunks: 2,
  'estimated data per chunk': '228KiB',
  'estimated docs per chunk': 1665
}
---
Shard mongors1 at mongors1/chat-shard1:27017,chat-shard1-replica1:27017,
chat-shard1-replica2:27017
{
  data: '459KiB',
  docs: 3342,
  chunks: 2,
  'estimated data per chunk': '229KiB',
  'estimated docs per chunk': 1671
}
---
Shard mongors2 at mongors2/chat-shard2:27017,chat-shard2-replica1:27017,
chat-shard2-replica2:27017
{
  data: '457KiB',
  docs: 3327,
  chunks: 2,
  'estimated data per chunk': '228KiB',
  'estimated docs per chunk': 1663
}
---
Totals
{
  data: '1.34MiB',
  docs: 10000,
  chunks: 6,
  'Shard mongors3': [
    '33.3 % data',
    '33.31 % docs in cluster',
    '140B avg obj size on shard'
  ],
  'Shard mongors1': [
    '33.41 % data',
    '33.42 % docs in cluster',
    '140B avg obj size on shard'
  ],
  'Shard mongors2': [
    '33.27 % data',
    '33.27 % docs in cluster',
    '140B avg obj size on shard'
  ]
}
The output above shows that the data is evenly distributed (thanks to hashed strategy).
Summary
This tutorial successfully created the replicated MongoDB sharded cluster running on top of the isolated Docker containers imitating real servers. We used a hashed sharding strategy to evenly distribute the data across shards replica sets based on email property.
During the tutorial, I tried to explain and describe only the necessary things. If the reader is interested in more details, they can use links to official documentation provided during this tutorial and study it more profound.
Finally, we needed 13 Docker containers to configure the Sharded Cluster. It was easier and cheaper (Docker is free) than setting up 13 Virtual Machines using your favorite Cloud Provider.